The WiringPi is required to interact with Raspberry Pi’s GPIO pins, it plays very important part to control zoned heating system, In this post i will show you how to install WiringPi on your Raspberry Pi. With WiringPi we can control multi zone heating system and your boiler relay that is connected directly on your Raspberry pi GPIO pin. if you want to build wireless zoned heating system then follow Wireless Arduino Multi Zone Controller Relay with nRF24L01.
Install WiringPi on Raspberry Pi
The WiringPi is maintained under GIT, If you do not have GIT installed, then under any of the Debian releases (e.g. Raspbian), you can install it.
|
1 |
sudo apt-get install git-core |
If you get any errors here, make sure your raspberry pi is up to date with the latest versions of raspbian or you can do so with following commands:
|
1 2 |
sudo apt-get update sudo apt-get upgrade |
To obtain WiringPi using GIT:
|
1 |
git clone git://git.drogon.net/wiringPi |
Fetch an updated version
|
1 2 |
cd wiringPi git pull origin |
Compile and Install WiringPi, The new build script will compile and install it all for you.
|
1 |
./build |
Now check installed version of WiringPi with gpio -v and then you can see all GPIO list with gpio readall
|
1 2 |
gpio -v gpio readall |
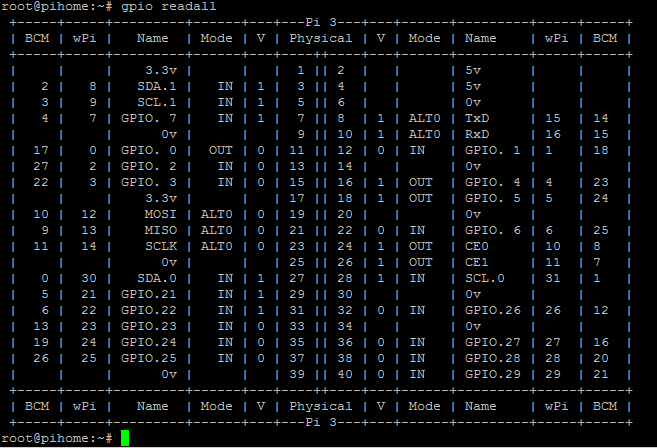
Wiringpi Installation
Note: WiringPi Pin number and Raspberry Pi GPIO numbers are not the same and make sure you have correct WiringPi GPIO saved int MySQL/MariaDB table otherwise you will have problems, see below image for Raspberry Pi GPIO pins and WiringPi Pins.
See below for wiring pi installed version and GPIO status and other relevant information.
|
1 2 3 4 5 6 7 8 9 10 11 12 13 14 15 16 17 18 19 20 21 22 23 24 25 26 27 28 29 30 31 32 33 34 35 36 37 38 39 40 41 42 |
gpio -v gpio readall root@pihome:~# gpio -v gpio version: 2.31 Copyright (c) 2012-2015 Gordon Henderson This is free software with ABSOLUTELY NO WARRANTY. For details type: gpio -warranty Raspberry Pi Details: Type: Pi 2, Revision: 01, Memory: 1024MB, Maker: Sony Device tree is enabled. This Raspberry Pi supports user-level GPIO access. -> See the man-page for more details root@pihome:~# gpio readall +-----+-----+---------+------+---+---Pi 2---+---+------+---------+-----+-----+ | BCM | wPi | Name | Mode | V | Physical | V | Mode | Name | wPi | BCM | +-----+-----+---------+------+---+----++----+---+------+---------+-----+-----+ | | | 3.3v | | | 1 || 2 | | | 5v | | | | 2 | 8 | SDA.1 | ALT0 | 1 | 3 || 4 | | | 5V | | | | 3 | 9 | SCL.1 | ALT0 | 1 | 5 || 6 | | | 0v | | | | 4 | 7 | GPIO. 7 | IN | 1 | 7 || 8 | 1 | ALT0 | TxD | 15 | 14 | | | | 0v | | | 9 || 10 | 1 | ALT0 | RxD | 16 | 15 | | 17 | 0 | GPIO. 0 | IN | 0 | 11 || 12 | 0 | IN | GPIO. 1 | 1 | 18 | | 27 | 2 | GPIO. 2 | IN | 0 | 13 || 14 | | | 0v | | | | 22 | 3 | GPIO. 3 | IN | 0 | 15 || 16 | 0 | IN | GPIO. 4 | 4 | 23 | | | | 3.3v | | | 17 || 18 | 0 | IN | GPIO. 5 | 5 | 24 | | 10 | 12 | MOSI | ALT0 | 0 | 19 || 20 | | | 0v | | | | 9 | 13 | MISO | ALT0 | 0 | 21 || 22 | 0 | IN | GPIO. 6 | 6 | 25 | | 11 | 14 | SCLK | ALT0 | 0 | 23 || 24 | 1 | OUT | CE0 | 10 | 8 | | | | 0v | | | 25 || 26 | 1 | OUT | CE1 | 11 | 7 | | 0 | 30 | SDA.0 | IN | 1 | 27 || 28 | 1 | IN | SCL.0 | 31 | 1 | | 5 | 21 | GPIO.21 | OUT | 1 | 29 || 30 | | | 0v | | | | 6 | 22 | GPIO.22 | OUT | 1 | 31 || 32 | 0 | IN | GPIO.26 | 26 | 12 | | 13 | 23 | GPIO.23 | OUT | 1 | 33 || 34 | | | 0v | | | | 19 | 24 | GPIO.24 | OUT | 1 | 35 || 36 | 0 | IN | GPIO.27 | 27 | 16 | | 26 | 25 | GPIO.25 | OUT | 1 | 37 || 38 | 0 | IN | GPIO.28 | 28 | 20 | | | | 0v | | | 39 || 40 | 0 | IN | GPIO.29 | 29 | 21 | +-----+-----+---------+------+---+----++----+---+------+---------+-----+-----+ | BCM | wPi | Name | Mode | V | Physical | V | Mode | Name | wPi | BCM | +-----+-----+---------+------+---+---Pi 2---+---+------+---------+-----+-----+ root@pihome:~# |
If you have all zone valve and boiler relay module or either connected directly to Raspberry Pi GPIO then you can run test to make sure everything works as it should, also make sure all wiring completed correctly you can wire all zone and boiler as per this Raspberry pi Multi Zone Heating Control System Relay.

5 comments
Can you clarify which number you use as GPIO_PIn in the mysql tabled
Is it the Hardware Pin No or the WiringPI number
I.e GPIO. hardware pin11 or WiringPI Pin 0
http://wiringpi.com/pins/
@tom,
its WiringPi ping number as per instructions.
Admin