I recently installed Home Assistant on a spare Raspberry Pi to play a bit with it and see what this system could offer. Once I got it running and configured it to control a couple of lights I started wondering if and how Home Assistant could be integrated with PiHome. After doing some researches I decided to give it a try, and by the end of the day everything was up and running!
The idea of this implementation is to leave PiHome handle all the heat system’s logic while being able to monitor the status of the system and trigger the boost function from Home Assistant.
The starting point for the integration is to have both Home Assistant and PiHome up and running. The examples illustrated below have PiHome running on a Raspberry Pi with IP address of 192.168.1.2 and setup with two zones called respectively “Living Room” and “Bedroom”. The Home Assistant configuration will need to be adjusted based on the actual name of your zones and with the correct IP address of your PiHome Raspberry Pi.
Update PiHome
To get started first of all update your PiHome software to latest version from Github. Login into your PiHome Raspberry Pi and issue following commands:
|
1 2 3 4 |
cd /var/www/ git pull origin cd /var/www/MySQL_Database/ php update_db.php |
Go to /var/www/api/ and check that you have the following files:
|
1 2 3 |
boostSet.php getBoiler.php getZoneStatus.php |
Check PiHome’s setup
Before proceeding with the Home Assistant configuration let’s do a few checks to ensure the PiHome APIs are working correctly.
1. Open a browser and go to http://192.168.1.2/api/getBoiler.php (replace 192.1.168.1.2 with the IP address of your Raspberry Pi running PiHome). You should get a response like the following:
|
1 |
{"success":true,"state":"OFF"} |
State should return the current status of your boiler (ON or OFF).
2. In the browser go to http://192.168.1.2/api/getZoneStatus.php?zonename=Living%20Room (replace 192.1.168.1.2 with the IP address of your Raspberry Pi running PiHome and “Living%20Room” with the name of one of your zones). You should get a response like the following:
|
1 |
{"success":true,"status":"0","temp":"18.4","datetime":"2021-02-28 18:56:40","bat_voltage":"2.50","bat_level":"43.00"} |
Status should return the current status of the zone (0 >> OFF and 1 >> ON), temp the current temperature of the zone, datetime the date and time of the last temperature update for the zone, bat_voltage the battery voltage of the zone’s temperature sensor and bat_level the battery level of the zone’s temperature sensor (in percentage).
3. In the browser go to http://192.168.1.2/api/boostSet.php?zonename=Living%20Room&state=1 (replace 192.1.168.1.2 with the IP address of your Raspberry Pi running PiHome and “Living%20Room” with the name of one of your zones). The boost function for the “Living Room” zone should activate.
4. In the browser go to http://192.168.1.2/api/boostSet.php?zonename=Living%20Room&state=0 (replace 192.1.168.1.2 with the IP address of your Raspberry Pi running PiHome and “Living%20Room” with the name of one of your zones). The boost function for the “Living Room” zone should deactivate.
If everything in the checks above worked as expected you are ready to continue with the Home Assistant configuration.
Home Assistant configuration
To create the Home Assistant entities needed to monitor and control PiHome the configuration.yaml file needs to be edit.
To control the PiHome boost function a switch entity needs to be created in Home Assistant for each zone. The command_line platform will be used together with the curl command to call the boostSet.php API. The example below shows the lines that need to be added to the configuration.yaml file to setup the switch entities for two zones. Replace 192.1.168.1.2 with the IP address of your Raspberry Pi running PiHome. While “Living%20Room” and “Bedroom” should be replaced with the actual names of your zones in PiHome. Additional zones can be added in the same way.
|
1 2 3 4 5 6 7 8 9 10 11 12 13 14 15 |
switch: - platform: command_line switches: livingroom_boost: command_on: "/usr/bin/curl -X GET 'http://192.168.1.2/api/boostSet?zonename=Living%20Room&state=1'" command_off: "/usr/bin/curl -X GET 'http://192.168.1.2/api/boostSet?zonename=Living%20Room&state=0'" command_state: "/usr/bin/curl -X GET http://192.168.1.2/api/boostSet?zonename=Living%20Room" value_template: '{{ value_json.state == true}}' friendly_name: Living Room Heat Boost bedroom_boost: command_on: "/usr/bin/curl -X GET 'http://192.168.1.2/api/boostSet?zonename=Bedroom&state=1'" command_off: "/usr/bin/curl -X GET 'http://192.168.1.2/api/boostSet?zonename=Bedroom&state=0'" command_state: "/usr/bin/curl -X GET http://192.168.1.2/api/boostSet?zonename=Bedroom" value_template: '{{ value_json.state == true}}' friendly_name: Bedroom Heat Boost |
Sensor entities need to be created in Home Assistant to monitor the status of the boiler and of the zones. The rest platform will be used to call the getBoiler.php and the getZoneStatus.php APIs.
To monitor the status of the boiler a simple binary_sensor entity is needed. While for zones templates will be needed to create sensor entities for the zone’s status, temperature, battery voltage and battery level. The example below shows the lines that need to be added to the configuration.yaml file to setup the sensor entities for two zones. Replace 192.1.168.1.2 with the IP address of your Raspberry Pi running PiHome. While “Living%20Room” and “Bedroom” should be replaced with the actual names of your zones in PiHome. Additional zones can be added in the same way.
|
1 2 3 4 5 6 7 8 9 10 11 12 13 14 15 16 17 18 19 20 21 22 23 24 25 26 27 28 29 30 31 32 33 34 35 36 37 38 39 40 41 42 43 44 45 46 47 48 49 50 51 52 53 54 55 56 57 58 59 60 61 62 63 64 65 66 67 68 69 70 71 72 73 74 75 76 77 78 79 80 81 82 |
sensor: - platform: rest name: zone_livingroom json_attributes: - status - temp - bat_voltage - bat_level resource: http://192.168.1.2/api/getZoneStatus?zonename=Living%20Room method: GET value_template: '{{ value_json }}' - platform: rest name: zone_bedroom json_attributes: - status - temp - bat_voltage - bat_level resource: http://192.168.1.2/api/getZoneStatus?zonename=Bedroom method: GET value_template: '{{ value_json }}' - platform: template sensors: livingroom_temp: friendly_name: "Living Room Temperature" value_template: '{{ states.sensor.zone_livingroom.attributes["temp"] }}' device_class: temperature unit_of_measurement: "°C" entity_id: sensor.zone_livingroom unique_id: zone_livingroom_temp livingroom_ms_batv: friendly_name: "Living Room MySensor Battery Voltage" value_template: '{{ states.sensor.zone_livingroom.attributes["bat_voltage"] }}' device_class: voltage unit_of_measurement: "V" entity_id: sensor.zone_livingroom unique_id: zone_livingroom_batv livingroom_ms_batl: friendly_name: "Living Room MySensor Battery Level" value_template: '{{ states.sensor.zone_livingroom.attributes["bat_level"] }}' device_class: battery unit_of_measurement: "%" entity_id: sensor.zone_livingroom unique_id: zone_livingroom_batl bedroom_temp: friendly_name: "Bedroom Temperature" value_template: '{{ states.sensor.zone_bedroom.attributes["temp"] }}' device_class: temperature unit_of_measurement: "°C" entity_id: sensor.zone_bedroom unique_id: zone_bedroom_temp bedroom_ms_batv: friendly_name: "Bedroom MySensor Battery Voltage" value_template: '{{ states.sensor.zone_bedroom.attributes["bat_voltage"] }}' device_class: voltage unit_of_measurement: "V" entity_id: sensor.zone_bedroom unique_id: zone_bedroom_batv bedroom_ms_batl: friendly_name: "Bedroom MySensor Battery Level" value_template: '{{ states.sensor.zone_bedroom.attributes["bat_level"] }}' device_class: battery unit_of_measurement: "%" entity_id: sensor.zone_bedroom unique_id: zone_bedroom_batl binary_sensor: - platform: rest resource: http://192.168.1.2/api/getBoiler method: GET name: boiler_zone value_template: '{{ value_json.state }}' device_class: heat - platform: template sensors: livingroom_zone_status: friendly_name: "Living Room Status" value_template: '{{ states.sensor.zone_livingroom.attributes["status"] }}' device_class: heat bedroom_zone_status: friendly_name: "Bedroom Status" value_template: '{{ states.sensor.zone_bedroom.attributes["status"] }}' device_class: heat |
Save the changes made to the configuration.yaml file and restart Home Assistant. Once Home assistant has been restarted navigate to Configuration > Entities and you should be able to see the entities created.
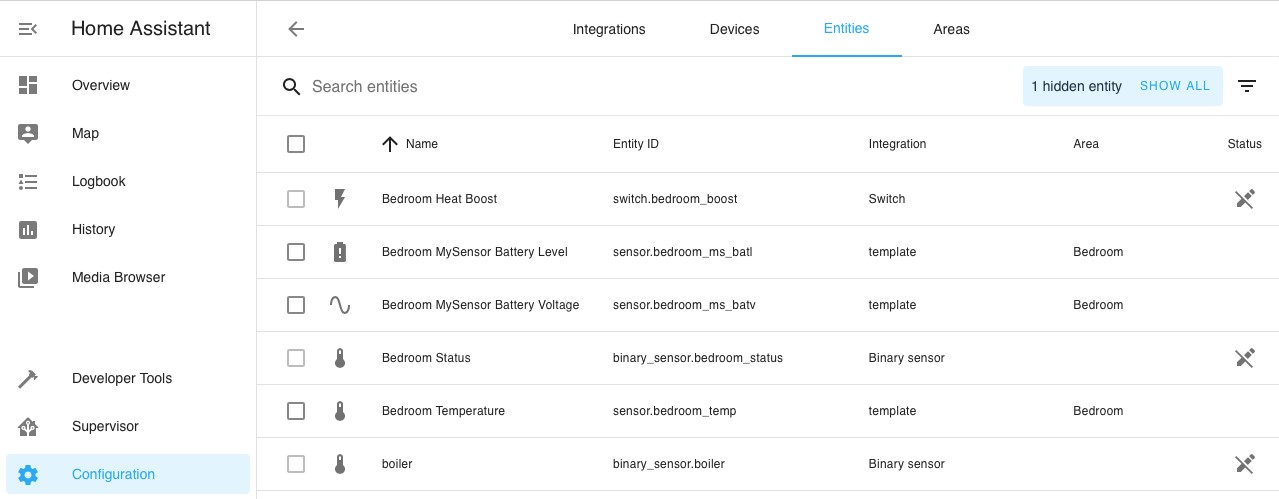
PiHome Home Assistant Configuration
Using the Home Assistant entities
The entities created can now be used to create dashboards to monitor the status of the heating system and trigger the boost function of each zone. The following entities will be available:
- – Boiler Status (binary sensor)
- – Zone Boost (switch)
- – Zone Status (binary sensor)
- – Zone Temperature (sensor)
- – Zone Sensor Battery Level (sensor)
- – Zone Sensor Battery Voltage (sensor)
Below are some examples of the dashboard cards that can be created with these entities.
1. Zone boost switches to activate the boost function for each zone

PiHome Home Assistant Zone boost switches
2. Zone temperature gauges and charts
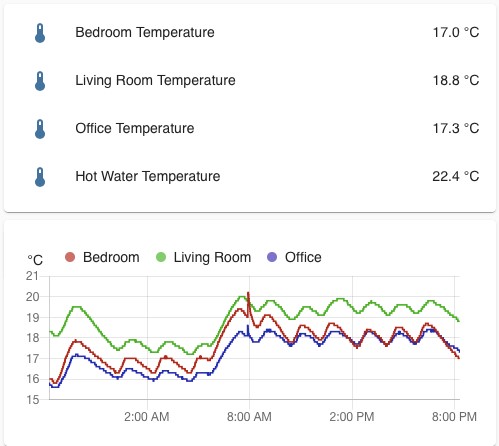
PiHome Home Assistant Zone Temperature gauges and charts
3. Sensors’ battery info
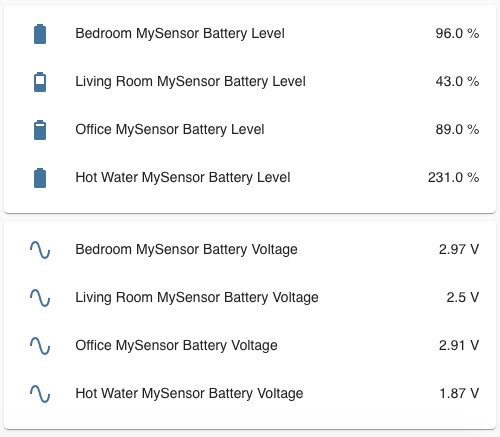
PiHome Home Assistant Sensors Info
4. Boiler status, Zone status and Zone Boost history graph

PiHome Home Assistant Zone
Once created the dashboards will of course be available also in the Home Assistant Companion Apps for iOS and Android.
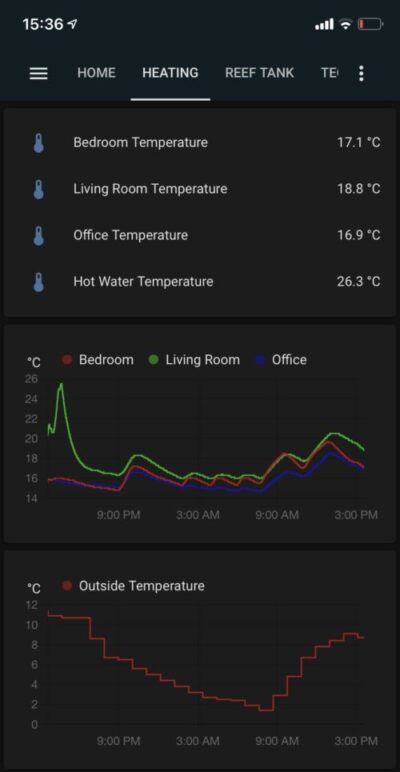
Home Assistant Companion Apps for iOS and Android

Home Assistant Companion Apps for iOS and Android
Possible applications
Several applications are possible once PiHome statuses and booster triggers are available in Home Assistant. Automations can be created using the temperature sensors as inputs and/or to trigger the PiHome boost function. E.g. turn on the boost for a certain zone when your phone with the Home Assistant Companion App leaves your workplace.
In addition, the PiHome sensors and boost switches will be available to all Home Assistant integrations. For example, with the HomeKit integration for Home Assistant the PiHome sensors and booster switches will be automatically pushed to the HomeKit app on your iOS phone. This will allow you to control PiHome using Siri without the need of installing Homebridge.
With the Google Assistant SDK add-on for Home Assistant you should be able to control PiHome directly from a microphone and speakers connected to your Home Assistant device. Integration with Alexa should also be possible.
Thank you https://github.com/JSa1987 for sharing this with community
