Build a Web connected raspberry pi thermostat and control your heating from any smart devices, PiHome comes with following two options one Wired to GPIO and wireless with nRF24L01.
I strongly suggest you to download PiHome Smart Heating img file for your raspberry pi with PiHome pre-installed and configured with all dependencies. You can download User Manual for PiHome Connection

Wired Heating System Connected to Raspberry Pi GPIO
- 1-Wire DS18b20 Temperature Sensor
- Multi Zone Heating Control System Relay
- Raspberry pi Heating Boiler Control System Relay
nRF24L01 Wireless Heating System Based on MySensors Library
- Battery Powered Arduino DS18B20 Temperature Sensor
- Wireless Arduino Boiler Controller Relay with nRF24L01
- Wireless Arduino Multi Zone Controller Relay with nRF24L01
- MySensors Serial/WiFi/Ethernet Gateway to communicate all nRF24L01 radio
Step 1
OS (Raspbian Jessie) Installation and WiFi Configuration
Step 2
Install Apache, PHP and MySQL on a Raspberry Pi (LAMP)
Step 3
MySQL Access From Remote Computer
Step 4
Install git and then clone pihome project from GitHub to your Apache document root location.
|
1 2 |
sudo apt-get install git sudo git clone https://github.com/pihome-shc/pihome "/var/www" |
MySQL/MariaDB
If you set to MySQL users and password as per instructions then run setup.php from command line otherwise modify setup.php with correct MySQL username and password and save it.
If you are using using Raspberry PI LAMP image from here then you need to perform these steps to create MySQL Database username and password.
|
1 2 3 4 |
mysql -u root -p CREATE USER 'pihome'@'localhost' IDENTIFIED BY 'pihome2018'; GRANT ALL PRIVILEGES ON *.* TO 'pihome'@'localhost' WITH GRANT OPTION; FLUSH PRIVILEGES; |
Run setup to install PiHome Smart Heating on your Raspberry Pi.
|
1 |
/usr/bin/php /var/www/setup.php |
setup.php will create pihome database and then import table structure, create table view, save db config file with and create all relevant cron jobs.
Set your time zone on your Raspberry pi and then set time zone settings in your MySQL/MariaDB Database(pihome->System->Timezone).
Step 5 – 6 Depends on your choice of Wired to GPIO or Wireless nRF24L01 System
Step 5
For wireless setup enable Wi-Fi Smart home gateway from Settings->Gateway
Step 6
Build 18650 Battery Powered Temperature Sensors
Now brows to your raspberry pi IP address while connected to your home Wi-Fi and you should see page. Default login username is admin and password pihome
PiHome Login Page
68 comments
Hi great job but I got a little lost on what to do here and how and where do i need to install the pihome files?
Step 4
Import MySQL database from /MySQL Database folder and add all view tables.
Hi David,
download pihome from github
MySQL Database file and table view code located under pihome/MySQL Database,
create database by importing pihome_mysql_database.sql and then create table view as per MySQL_View.sql ( you need to do this one by one.
let me know if you need help with database.
Admin
Hello. First of all, I’d like to thank you for working on this amazing project and sharing it with us. Though I must say that I have been trying to set it up for two days now and no matter what I did I couldn’t get the index.php file to load. I keep getting “This page isn’t working. 192.168.x.x is currently unable to handle this request.” which I believe is a “Gateway 500” error. I tried nginx, lighttpd, apache2 but all of them gave the same result. I have probably tried all variations of permissions but none which seem to work. I also should mention that I made sure that my web server is fully functioning by installing WordPress on it. After the wordpress installation, I tried to put PiHome’s files on “/var/www/html” directory by replacing Worpress installation files, yet that didn’t work either.
Do you have any idea what might be going wrong with this? I imported those two database files(though had to deal with MySQL_View.sql manually) and set the gateway script accordingly. I really wish to get your code working on my Pi and it would be a huge letdown for me if I couldn’t resolve this php file on my hardware. I currently have apache2, phpmyadmin and MariaDB installed and as I said earlier, I have no problems running php files except PiHome. I even tried running it on a different Pi, which unfortunately didn’t change the result either.
Thank you.
Hi Jason,
for some reason i had missed very small details in LAMP installation http://www.pihome.eu/2017/10/11/apache-php-mysql-raspberry-pi-lamp/ you need to change document root of apache.
by default apache installed with document root pointing to var/www/html, you need to change this in /etc/apache2/sites-available/000-default.conf and change DocumentRoot /var/www/html to DocumentRoot /var/www/ and copy all project folder to this location.
after these changes restart apache werver
sudo service apache2 restartlet me know you how you get on with this. i have updated LAMP post as well to reflect this change.
Still no luck. This is from “/var/log/apache2/access.log”
192.168.xx.xx – – [13/Dec/2017:12:07:25 +0300] “GET /index.php HTTP/1.1” 500 297 “-” “Mozilla/5.0 (Windows NT 10.0; Win64; x64) AppleWebKit/537.36 (KHTML, like Gecko) Chrome/62.0.3202.89 Safari/537.36 OPR/49.0.2725.47”
It seems that I’m still getting a Gateway 500 error.
“/var/log/apache2/error.log” doesn’t throw anything.
very quick question, did you create table views as well as per MySQL_View.sql file?
Admin
Yes I have. I opened the file in notepad and ran each view individually in phpmyadmin. Though I imported the other file using MariaDB. So there shouldn’t be any problems regarding the database. I double checked that one. I think it would at least throw an error like “The database connection failed.” instead of not loading at all. I remember seeing something similar in the code. If you need more information about my setup, feel free to ask. I’d be glad to provide anything in order to get this working. 🙂
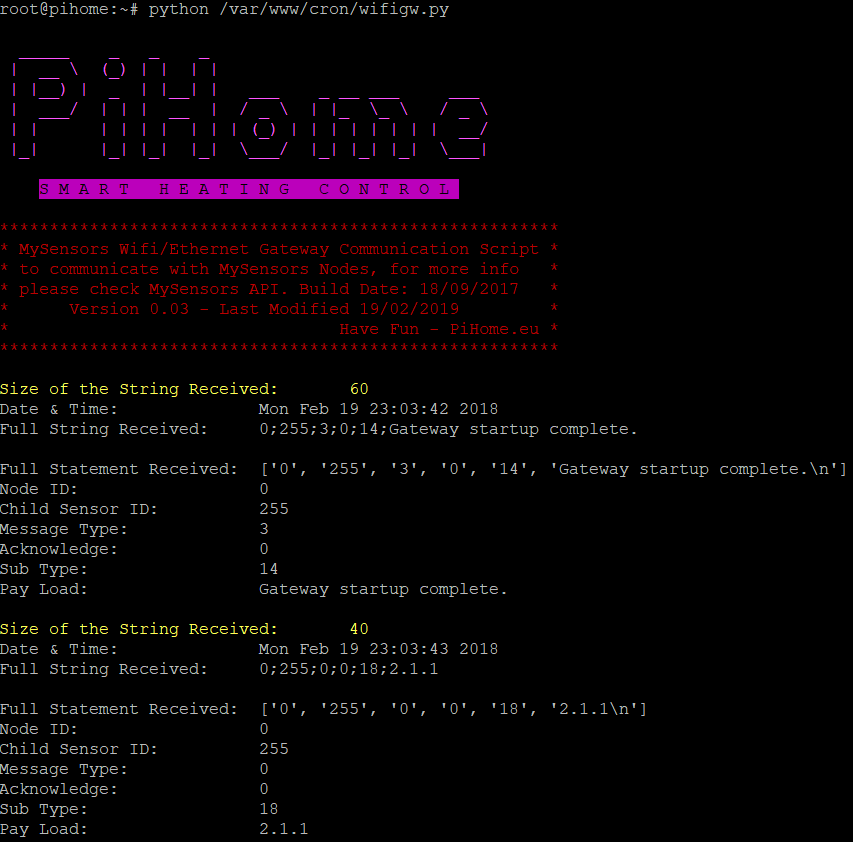
can you run /usr/bin/php /var/www/cron/boiler.php
double check symbolic link in cron folder.../st_inc/connection.php../st_inc/functions.php
../st_inc/session.php
if db is setup correctly you should see. its very hard to check what might be wrong but if you have time you can open ssh session with me and i can have look what is going on for you.
boiler.php should output something like this.
| __ \ (_) | | | |
| |__) | _ | |__| | ___ _ __ ___ ___
| ___/ | | | __ | / _ \ | |_ \_ \ / _ \
| | | | | | | | | (_) | | | | | | | | __/
|_| |_| |_| |_| \___/ |_| |_| |_| \___|
S M A R T H E A T I N G C O N T R O L
*******************************************************
* Boiler Script Version 0.2 Build Date 29/06/2017 *
* Have Fun – PiHome.eu *
*******************************************************
2017-12-13 19:40:17 – Boiler Script Started
—————————————————————————————-
2017-12-13 19:40:18 – Zone ID: 33
2017-12-13 19:40:18 – Zone: Ground Floor Controler: 101 Controler Child: 1 Zone Status: 0
2017-12-13 19:40:18 – Zone: Ground Floor Stop Cause: Schedule Target C Achieved -Target C:20 Zone C:20.80
—————————————————————————————-
2017-12-13 19:40:19 – Zone ID: 34
2017-12-13 19:40:19 – Zone: First Floor Controler: 101 Controler Child: 2 Zone Status: 0
2017-12-13 19:40:19 – Zone: First Floor Stop Cause: No Schedule -Target C:0 Zone C:16.60
—————————————————————————————-
2017-12-13 19:40:20 – Zone ID: 35
2017-12-13 19:40:20 – Zone: Ch. Hot Water Controler: 101 Controler Child: 3 Zone Status: 0
2017-12-13 19:40:20 – Zone: Ch. Hot Water Stop Cause: Schedule Target C Achieved -Target C:28 Zone C:32.80
—————————————————————————————-
2017-12-13 19:40:20 – Boiler Switched Off At: 2017-12-13 18:30:01
2017-12-13 19:40:20 – Boiler Node ID: 100 Child ID: 1
2017-12-13 19:40:20 – Boiler Fired Status: 0
2017-12-13 19:40:20 – Boiler Hysteresis Status: 0
—————————————————————————————-
2017-12-13 19:40:20 – Boiler Script Ended
****************************************************************************************
The output of boiler.php is as follows:
_____ _ _ _
| __ \ (_) | | | |
| |__) | _ | |__| | ___ _ __ ___ ___
| ___/ | | | __ | / _ \ | |_ \_ \ / _ \
| | | | | | | | | (_) | | | | | | | | __/
|_| |_| |_| |_| \___/ |_| |_| |_| \___|
S M A R T H E A T I N G C O N T R O L
*******************************************************
* Boiler Script Version 0.2 Build Date 29/06/2017 *
* Have Fun – PiHome.eu *
*******************************************************
PHP Warning: require_once(connection.php): failed to open stream: No such file or directory in /var/www/cron/boiler.php on line 19
PHP Fatal error: require_once(): Failed opening required ‘connection.php’ (include_path=’.:/usr/share/php’) in /var/www/cron/boiler.php on line 19
So group and owner for “/var/www” and the files/folders inside are set to www-data and I already tried to run “/usr/bin/php /var/www/cron/boiler.php” with different permissions for the document root and everything inside. The output was the same no matter what I tried.
Changing line 19 to “require_once $_SERVER[‘DOCUMENT_ROOT’].’/st_inc/connection.php’;
and line 20 to require_once $_SERVER[‘DOCUMENT_ROOT’].’/st_inc/function.php’;
gave the same output again.
What am I missing here?
You dont need this anymore, just update your pihome code from github.
you need to create three symbolic link files, see image of my cron folderthree symbolic link url
../st_inc/connection.php
../st_inc/functions.php
../st_inc/session.php
I can’t believe I overlooked that part even though you pointed it out many times. It seems to be fine now, except for the part that I think I’ll have to switch back to php5 since mysql is replaced with mysqli or PDO starting from php7.0. Won’t be able to work on it tonight, but I’ll make sure to report back until tomorrow evening. 🙂 Thanks for all your help so far. (12:35 A.M. here)
_____ _ _ _
| __ \ (_) | | | |
| |__) | _ | |__| | ___ _ __ ___ ___
| ___/ | | | __ | / _ \ | |_ \_ \ / _ \
| | | | | | | | | (_) | | | | | | | | __/
|_| |_| |_| |_| \___/ |_| |_| |_| \___|
S M A R T H E A T I N G C O N T R O L
*******************************************************
* Boiler Script Version 0.2 Build Date 29/06/2017 *
* Have Fun – PiHome.eu *
*******************************************************
PHP Fatal error: Uncaught Error: Call to undefined function mysql_connect() in /var/www/st_inc/connection.php:3
Stack trace:
#0 /var/www/cron/boiler.php(19): require_once()
#1 {main}
thrown in /var/www/st_inc/connection.php on line 3
you are very welcome, Yes, this project is written with php5 and i dont have spare time to upgrade all that may be if you have spare time you are welcome to update it. for time being you need to follow these steps LAMP with PHP5
I wanted to let you know that I managed to get it working on php7.0. Now I’ll try to meddle with the code and see what will come of it.
Hello, you have a great software, but i’m not able to install it. i have tryed several times but no success. can you help me with the install or you can do it for me.
please write to petkovmiroslav (at) abv . bg
Hi Miroslav,
did you follow steps? where you have issue?
Admin
I have installed RasbPI strech, Apache and phpmyadmin, but i cannot attach datapase and i’m not shure how to do it. could you make an ready image for RaspberryPI with all preinstalled settings?
this will be much better and easy for someone who doesn’t have the knowledge to do it. and when the raspberry will do only heating managment
Hi Miroslav,
i thought about this in past but as many people prefer to start from zero. i can upload full SD card image but its 16gb.
Admin
Plase do so, you can arhive it. My card is also 16gb, and i have bought my Pi for my heating
You can put raspberry as a default password for everything (root, pi, sql, phpmyadmin…) This can be the default installation.Everyone who want to start from the beginning, can do it with this tutorial.
Hi
Thank you for all of your hard work on this project, I am keen to get pihome running but I am a bit inexperienced with linux.
I have managed to get to stem 4, and the pihome setup.php seems to run ok, but when I log in to pihome in the browser I get the error message below,
Sorry We are experiencing connection Problem…Table ‘testing.user’ doesn’t exist
Any advice would be greatly appreciated.
Hi Brett,
sorry my mistake, can you please download project again and run setup or only download setup.php file and replace it and run in again. setup.php file had testing database name whereas it should have been pihome.
let me us know how you get on. i can do one remote session with you to setup this, i have plan to make full sd card where everyone can download img file and burn it on sd card.
Thanks Admin
I made the change and it seems to be up and running now! time to build the gateway and to get out the soldering iron 🙂
Hi Brett, glad it worked for you.
Admin
Hi Admin
I now have the wifi gateway working, but I’m not sure if it is communicating with the rpi. Also, how do I add/edit zones and in the pihome interface, is it all done through phpMyAdmin?
Thanks in advance
Brett
Hi Brett,
you need to modify wifigw.py and change HOST = “192.168.99.3” ip address and port number, once correct ip address added save it and run
python /var/www/cron/wifigw.pyYes you can modify zone info via phpmyadmin, i have build any web interface to modify these settings.
ps: make sure you have all cron jobs configured
*/10 * * * * /usr/bin/php /var/www/cron/system_c.php >/dev/null 2>&1
*/30 * * * * /usr/bin/php /var/www/cron/update_weather.php >/dev/null 2>&1
*/2 * * * * sh /var/www/cron/check_wifi.sh >/dev/null 2>&1
*/2 * * * * php /var/www/cron/check_gw.php >/dev/null 2>&1
*/1 * * * * /usr/bin/php /var/www/cron/boiler.php >/dev/null 2>&1
Your project kooks very good and thank you for sharing. What if I don’t want to use mysensors gateway and wireless temperature sensors, can i connect temperature sensors to rpi gpio and relay board to rpi gpio to control all from one place? Is it easy to do what i want ? What files need modifications, i m not a professional programmer but i can manage some php (as pihome is mostly in php)
Thakn you
Hi Murt,
Yes you can connect your zone relay and temperature sensors directely to raspberry pi gpio but make sure you make some changes to /cron/boiler.php and add goip pins number for each zone in zone table and gpio pin number for boiler in boiler table.
Modifications for cron/boiler.php
Un-commencement following two lines for Zone Rrelay
//exec("/usr/local/bin/gpio write ".$zone_gpio_pin." ".$zone_status );//exec("/usr/local/bin/gpio mode ".$zone_gpio_pin." out");
Un-commencement following two lines for Boiler On Status
//exec("/usr/local/bin/gpio write ".$boiler_goip_pin ." ".$new_boiler_status );//exec("/usr/local/bin/gpio mode ".$boiler_goip_pin ." out");
Un-commencement following two lines for Boiler Off Status
//exec("/usr/local/bin/gpio write ".$boiler_goip_pin ." ".$new_boiler_status );//exec("/usr/local/bin/gpio mode ".$boiler_goip_pin ." out");
can make one sd card image with all required software preinstalled? i m not being lazy but it would help some people like me who got very little knowledge of computer programing.
Hi Edd,
i m working on to upgrading php code to work with php 7 once that is done i’ll build sd card image and upload to this site but until then you have to follow all the steps if any difficulty drop comments.
thank you
Admin
Hi. I have used your latest SD LAMP image with php 7 and cloned the pihome folders as directed.
There appear to be issues with usernames and passwords for the various inter-communicating functions.
I have been through many of your docs looking for the crucial detial, but since you released the new build, I’m not sure what’s relevant to what. Any chance you (or someone who knows how to) can run through a checklist of configurations to get everything to talk together? For example, setup.php contains:
$hostname = ‘localhost’;
$dbname = ‘pihome’;
$dbusername = ‘pihome’;
$dbpassword = ‘pihome2018’;
… but I don’t know if these are correct for the SD php 7 build – and how the chain of usernames from root up to pihome all works.
Help for a noob gratefully received!
Hi,
Thank for letting me know, i have update instructions, now you need to perform following three commands to create database user name with password and give it permission to use database.
mysql -u root -pCREATE USER 'pihome'@'localhost' IDENTIFIED BY 'pihome2018';
GRANT ALL PRIVILEGES ON *.* TO 'pihome'@'localhost' WITH GRANT OPTION;
FLUSH PRIVILEGES;
Thanks for swift revert! – and, of course for the time and effort on the project in the first place.
Following the ‘CREATE USER’ commands I was able to run setup.php – and it indicated success.
I’m using a RPi B2 so I don’t have WiFi directly to the unit, but can get to Apache from ethernet.
I can access phpMyAdmin OK and I see 5 schemas including pihome.
However, at this point, I don’t see any pihome control panel – I only get the default Apache page. Or do I NEED a WiFi adapter to get to the panel?
What am I missing? Will it run without any sensors or relays connected? (Haven’t got there yet)
Also, can a desktop be enabled? Working over SSH seems a bit like painting a house through the letterbox…
Cheers! Where can I send beer tokens to?
@Al, thank you for your comments, i have shared SD card image pre-installed all dependencies along with pihome and cron jobs created if you can then best to download this image as it will save you lot of time and this release gives one more feature: control your heating from anywhere without opening any ports on your router.
back to your question: As you you are using LAMP with php7 image you need to modify last bit to get pihome working i.e.
Change Document Root Folder
By default Apache server installed with document root pointing to /var/www/html, you need to change this in /etc/apache2/sites-available/000-default.conf for PiHome to work. and then restart Apache server:
/etc/init.d/apache2 restartYou don’t need wifi to access pihome web interface, you can have pihome running without any sensors or relay attached but without temperature readings systems will go in safety mode i.e frost protection and ignore away, schedule. to avoid this for testing you can add some fake readings for temperature for each zone no older then 24hours.
You can enable desktop its just most people have raspberry pi running and access it via ssh with putty to do all but its your choice really, i disabled in all my installations to save some resources.
Hi again,
I did as you suggested and downloaded the new image:
‘PiHome Smart Heating Controller with All dependencies’
but when I run it up. it still does not seem to have pihome installed. Is this right?
So, I went to do the clone to get it, but when I run setup.php it returns a syntax error:
PHP Parse error: syntax error, unexpected ‘$result’ (T_VARIABLE) in /var/www/setup.php on line 196
… so a. should pihome be already loaded on the new image and b. if not, how do I resolve the syntax error…
(and, yes the desktop is enabled – my monitor cable was not plugged it properly. Doh!)
Thanks!
\Al
And again…
I had been using Rufus to burn my Kingston 8G SD-HC cards from W7. It gave no errors. Just on the off chance I tried Etcher – and it reported that my 8G cards were too small by 315M (the size was reported as 7.7G). Now using a 16G card with Etcher, and the experience is different again.
This time, there is no desktop, although there is an offer of login at tty1 on the desktop screen, but i cant find a combination of u/p that will get in. I CAN login using SSH, and after running setup and restarting apache I get the control panel, Success!
Thanks for the build! note to all – use a 16G SD card!
@Al
login credentials are on download page.and you need to enable desktop if you want.
run sudo raspi-config and select Boot Option and then B1 option to enable/disable desktop on boot.
Hi, I’m trying to instal on raspbian stretch where i installed LAMP with php 7.
but when i try setup.php also i receive
PHP Parse error: syntax error, unexpected ‘$result’ (T_VARIABLE) in /var/www/setup.php on line 196
i installed php 7 i thought in this last relase pihome support it, maybe i’m wrong and this is the cause of the error?
hi giribaldo,
i suggest you to download sd card image file pre-loaded with all dependencies and pihome from downloads section. it will save you lots of time.
Hi! Thanks for the answer,
First I want to say that you are making wonderful work!
For the error, I think I found. The reason in the setup.php
join zone zone_idx on override.zone_id = zone_idx.id;”
It seem is missing a ; at end
join zone zone_idx on override.zone_id = zone_idx.id;”;
So I was able to complete the setup and generate db ecc…
Now I’m having problem with the gpio_ds18b20.py
This because I modified to read modbus from a plc and at this moment it don’t update nodes on the db. I had no time already to troubleshoot the problem
@giribaldo,
thank you, i have update the setup.php, as long as you can save temperature readings in message_in table you are ok, you can manually add nodes information in nodes table to get temperature sensors presented to relevant zone. on same note pihome heating controller can be managed from http://www.pihome.eu/mypihome without opening any ports on your router.
I was able to read plc registers trought modbus and write to message_in and nodes!!
don’t ask me why because is just few days that i look at python… just i needed to change:
cur.execute(‘SELECT COUNT(*) FROM
nodeswhere node_id = (%s)’, (IDs[i]))to:
sql = (“SELECT COUNT(*) FROM
nodeswhere node_id = %s”) % IDs[i]cur.execute(sql)
i don’t know if this apply only to my setup and why.
i now feel more confortable 🙂 and at a good starting point
by the way, i sure would use the image you prepared, just i have some other things on the raspberry and still have not decided if start from your image and add other things or add pihome to image i’m using.
are just 3 days that in spare time i’m testing pihome to decide if i can use for my purpose and i must say that i like much the way you done!
also for now i still don’t use dallas sensors and from plc i’m reading the imput of classical thermostats just in this way i could make overraide boost schedules ecc.. and if the raspberry crash the plc turn to standard mode.
i think if i can, also when i will put the dallas temp i will leave in place the standard (programmable) termostat, so the heating could work as usual even without the raspberry 🙂
good to know you got there in the end. reason i prepared the img file for lots of people sending me emails about problems with installation. on raspberry pi crash side it did happened to me in past and i just added following lines to my boiler.php to check cpu temperature and if it is higher than 55c then reboot pi.
boiler.php
// safety, if system hangs and does not respond as some time Dallas temperature sensors connected to gpio do not respond and cpu temperature goes very high i.e. above 55c then reboot pi.$system_c = exec ("vcgencmd measure_temp | cut -c6,7,8,9");
echo "CPU temperature: ".$system_c."\n";
if ($system_c > 55) {
$query = "INSERT INTO system_log(c, reboot) VALUES ('{$system_c}', 'reboot');";
mysql_query($query, $connection);
exec("python /var/www/reboot.py");
}
here is reboot.py
command = "/usr/bin/sudo /sbin/reboot"import subprocess
process = subprocess.Popen(command.split(), stdout=subprocess.PIPE)
output = process.communicate()[0]
print output
Just wanted to say great work!
I’m not sure if I’ve missed it somewhere, but is there functionality for forced-air cooling?
Thanks!
@John,
thank you, you mean controlling heating and cooling? if that is the case then no, where i m based we only need heating as its hardly any summer but i m open to suggestion to make room for this option.
Ah, yes, for both heating and cooling with a forced-air system — basically you have three ‘inputs’ to the furnace, for fan / cooling / heating. Adding in cooling, with the great looking system you’ve got, would greatly increase the number of people that would use the system in North America, where it’s hot and sticky in the summer 😉
@John,
lets take this offline, can you drop me email at info@pihome.eu and work on this to add heating/cooling option.
You’ve been doing a great job! 🙂
What are the things that I need to change in your sd img to make it work with temp. sensor and boiler relay via GPIO? I’ve read all your tutorials many times but never managed to get it to work.
@Ales,
first add WiringPI GPIO number for each zone and boiler, if you have temperature sensors connected to GPIO as well then you need to add gpio_ds18b20.py in your cron job and hen change temperature sensors id for each zone.
*/1 * * * * python /var/www/cron/gpio_ds18b20.py >/dev/null 2>&1hop this helps, share you experience here as well. you can use piconnect which is free to manage your home heating from anywhere.
Where do I change the sensor id for each zones? Is it in the database in zone>sensor_id? How do I know the correct sensor_id? I am guessing it is not the long number like 28-02049246ea0f.
Also for now, I need to have it as one zone and boiler is heating up everything. So no zone control, only boiler turning on and off. What would I need to change for that?
I am sorry for these basic questions, I took on a more difficult project than I expected.
when you run python /var/www/cron/gpio_ds18b20.py it will save all temperature sensors id (28-02049246ea0f) in node table, you can delete all your exiting zone and re-create them with correct sensor id.
when I run it, I get the following error:
Sun Oct 14 14:36:23 2018 – DS18B20 Temperature Sensors Script Started
——————————————————————–
Traceback (most recent call last):
File “/var/www/cron/gpio_ds18b20.py”, line 88, in
insertDB(IDs, temperature)
File “/var/www/cron/gpio_ds18b20.py”, line 53, in insertDB
cur.execute(‘SELECT COUNT(*) FROM
nodeswhere node_id = (%s)’, (IDs[i]))File “/usr/lib/python2.7/dist-packages/MySQLdb/cursors.py”, line 210, in execu te
query = query % args
TypeError: not all arguments converted during string formatting
@Ales
Have look here, i can not replicate this issue but some one suggested to change
http://www.pihome.eu/2018/02/15/ds18b20-temperature-sensor-to-mysql-mariadb-database/
this line (around 88)
insertDB(IDs, temperature)to this
insertDB(IDs[0], temperature)output with insertDB(IDs, temperature)
Mon Oct 15 12:00:54 2018 - DS18B20 Temperature Sensors Script Started--------------------------------------------------------------------
Mon Oct 15 12:00:59 2018 - New DS18B20 Sensors Discovered 28-01156572dbff
Mon Oct 15 12:00:59 2018 - Sensors ID 28-01156572dbff Temperature 27.125
Mon Oct 15 12:00:59 2018 - New DS18B20 Sensors Discovered 28-000006d73924
Mon Oct 15 12:00:59 2018 - Sensors ID 28-000006d73924 Temperature 19.187
Mon Oct 15 12:00:59 2018 - New DS18B20 Sensors Discovered 28-000006d71f15
Mon Oct 15 12:00:59 2018 - Sensors ID 28-000006d71f15 Temperature 22.312
Mon Oct 15 12:00:59 2018 - New DS18B20 Sensors Discovered 28-000006d86388
Mon Oct 15 12:00:59 2018 - Sensors ID 28-000006d86388 Temperature 20.5
Mon Oct 15 12:00:59 2018 - New DS18B20 Sensors Discovered 28-000006d7c4e8
Mon Oct 15 12:00:59 2018 - Sensors ID 28-000006d7c4e8 Temperature 28.187
Mon Oct 15 12:00:59 2018 - New DS18B20 Sensors Discovered 28-03156520b4ff
Mon Oct 15 12:00:59 2018 - Sensors ID 28-03156520b4ff Temperature 26.937
result with insertDB(IDs[0], temperature)
Mon Oct 15 12:05:23 2018 - DS18B20 Temperature Sensors Script Started--------------------------------------------------------------------
Mon Oct 15 12:05:28 2018 - New DS18B20 Sensors Discovered 2
Mon Oct 15 12:05:28 2018 - Sensors ID 2 Temperature 27.062
Mon Oct 15 12:05:28 2018 - New DS18B20 Sensors Discovered 8
Mon Oct 15 12:05:28 2018 - Sensors ID 8 Temperature 19.187
Mon Oct 15 12:05:28 2018 - New DS18B20 Sensors Discovered -
Mon Oct 15 12:05:28 2018 - Sensors ID - Temperature 22.312
Mon Oct 15 12:05:28 2018 - Sensors ID 0 Temperature 20.562
Mon Oct 15 12:05:28 2018 - New DS18B20 Sensors Discovered 1
Mon Oct 15 12:05:28 2018 - Sensors ID 1 Temperature 28.125
Mon Oct 15 12:05:28 2018 - Sensors ID 1 Temperature 26.562
you can see sensors id first digit is taken, i can not replicate this issue and its reported by some other users as well.
I have had the same issue with ds18b20 sensors directly connected to raspberry pi.
Tried the above fix but, as shown above can lead to duplicate sensor IDs, I have found another fix that seems to work and parse the complete sensor ID.
In /var/www/cron/gpio_ds18b20.py change line 53
cur.execute(‘SELECT COUNT(*) FROM
nodeswhere node_id = (%s)’, (IDs[i]))to
cur.execute(‘SELECT COUNT(*) FROM
nodeswhere node_id = (%s)’, [IDs[i]])notice the change of (IDs[i]) to [IDs[i]]
After making this change sensors should be added to table with full sensor ID.
After making this change you will also have to make a change to boiler.php
I added the following line in
$zone_sensor_id= “‘”.$zone_sensor_id.”‘”;
after line 78
$zone_sensor_id=$row[‘sensors_id’];
Quick and dirty fix can probably be better handled but my php skills aren’t that good 🙁
Might also break thing if non gpio sensors are in the mix don’t know as I don’t currently have the setup to test.
Hope this helps someone
Thanks for such a great project
Hi,
I’m currently running the latest version from github. Is there a way to upgrade the database structure without losing all the data? I see running setup.php drops all the tables and recreates the structure.
Also we should find a way to take care not to add duplicated cron jobs. I found this out the hard way on my side there were duplicate db entries and after hours of debugging I found out that it appended the cronjobs to the old cron config file after running setup.php manually 🙂
All the best,
Alex
@Alex, right now there isnt any way to update structure i will try my best for future updates to have structure updates as well as full db update. if you know any way of comparing two databases and extracting changes drop me line.
on cron jobs i have web interface which i m working on but this need some time to refine and get it work they way i wanted it to untill then its only text you can copy past in your crontab.
Hello. I am very interested in implementing this project on my home heating system which is the same as yours. I will be using wired control and starting with your sd card system image and my first question is do I need to use the seperate 2 way relay for the boiler – is it possible to use the spare one on the 4 way relay ? and second will it be possible to program pump overrun to disipate the boiler heat through the rads for say 1 minute after the boiler shuts down, which means the pump/valve relay stays on for 1 minute after the boiler relay is off ?
Many thanks for a facinating project.
Hi Ian,
you don’t need separate 2 way relay, you can get single relay for boiler or you can use spare one on 4 relay board it is really up to you, right now there is not function to delay stooping zone valves for dissipate heat from boiler but wireless system have this function. but you are welcome to suggest if you know php.
Hello and thank you for your kind reply.
Having read this site I am now looking for, but cannot find “WiringPi” – I am presuming I still need to install this before attempting to use a hard-wired to GPIO setup ?
If WiringPi is no longer needed, can you detail the software changes I have to make, if any ?
Please note I have updated PiHome to 1.72 and run the database update script.
Your help is much appreciated.
Hi Ian,
if you dont have WiringPi installed and have other liberary to access gpio pins then you have to specify pin number relevent in library and change boiler.php file in three locations
Zone Valve Wired to Raspberry Pi GPIO Section: Zone Vole Connected Raspberry Pi GPIO.
Boiler On section and Boiler Off section
Boiler Wired to Raspberry Pi GPIO Section: Make sure you have WiringPi installed.
Hello and thank you for your reply.
I am a complete noob so I was confused by your reply.
Web search told me to run …. $ gpio -v and it returns that WiringPi was already included in your image file. Also the boiler.php and library files also appear to be already configured with the correct pins for the hard-wired (non wi-fi) setup.
I will now go ahead and order the parts – many thanks for your help.
Hi Ian,
sorry if i made you confused, i thought you wanted to use something else to access gpio, PiHome raspberry pi img file comes with everything per-installed for you its plug-n-play. you need to edit exiting zone with correct gpio pin you want to use.
Hello again. I am Ian and I refer to our messages above. I have now obtained and wired everything in accord with the instructions on this site. It is plugged but it will not play. Pihome does not detect anything connected. Is there a configuration or setup program that I have to run? Also having difficulty with ds18b20’s, gpio readall says gpio4 is pin16, is it still correct to wire data to pin16 because I cannot find a w1_slave folder underneath the sensor folder. Sorry for so many questions. Many thanks.
Hi Ian,
if you are using wired system you have to create node under settings->nodes for gpio and modify your boiler and zones for correct gpio. this change was introduced in version 1.73 to streamline the code for future developments.
Many thanks Admin.
I notice that in the zones-add pull down menu GPIO only lists pins 1 through 8.
According to your wiring diagrams the relays should be wired to GPIO pins 21,22,23,24
Have you changed the recommended wiring – should I now wire the relays to GPIO pipns selected from 1-8 ?
Your help is much appreciated.
PS is 1-wire still pin 16 (GPIO4)?
Hi Ian,
you can updated your PiHome from github and after that all gpio list are in /st_inc/gpio_pin_list file, reason for adopting file was so if people using different single board computer with different available gpio pins can use this. if you are using raspberry pi then WiringPi is the way to access gpio pins.
Hello.
I have updated my v1.73 via “git pull origin” etc today April 2nd and “php update_db.ph”
However I cannot now login via the web browser, “admin” and “pihome” is not working.
Have the credentials been changed and if so what are they please ?
if not changed, how do I reset please ?
Hello
Admin very kindly fixed my log-in problem – thank you very much it was very good of you and much appreciated.
I had caused the problem myself by running setup after I had updated, and that had caused the log-in problem.