The nRF24L01+ transceiver module uses the 2.4GHz band and it can operate with baud rates from 250kbps up-to 2Mbps true ultra low power and low cost transceiver. nRF24L01+ communicate with Arduino via SPI interface and it consumes around 12mA with operating voltage from 1.9v to 3.3v. nRF24L01+ can communicate with other nRF transceiver modules and it can reach 100m in clear line of sight with lower baud rate. In this article I will explain you how to connect nRF24L01 with Arduino, Let’s Connect Arduino with nRF24l01 Radio.
Basic nRF24L01+ pin connection with Arduino
Below table for Arduino Pin and nRF24L01 pins and colour for easy understanding otherwise you can use any colour cable.
| Arduino Pro Mini/Nano | nRF24L01+ | Colour |
| GND | GND | Black |
| 3.3V | VCC | Red |
| 9 | CE | Orange |
| 10 | CSN/CS | Yellow |
| 13 | SCK | Green |
| 11 | MOSI | Blue |
| 12 | MISO | Violet |
| 2 | IRQ | Gray |
Here how nRF24L01 connect with Arduino, i also added battery connection to RAW pin and GND as i m feeding Arduino through RAW pin and using on board voltage regulator to get propoer voltage to arduino board and to nrf24l01. To conserve battery you need to remove two LEDs from Arduino board.
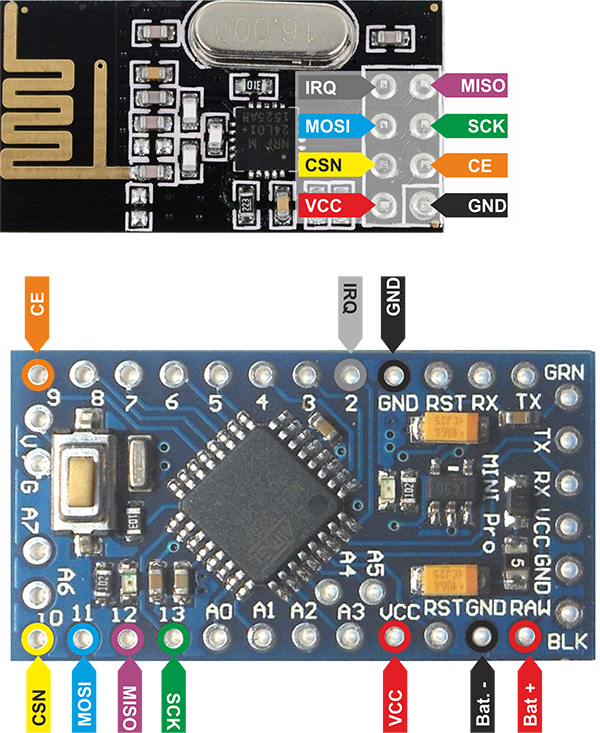
nRF24L01 with Arduino Connection
Once basic connections between Arudino and nRF24L01 are completed then its easy to connect OneWire DS18B20 Temperature Sensor with arduino which only requires 3 pins and same goes for Relay module to control Boiler or Relay module for Zone valve.

5 comments
The NRF24L01 Requires 3.3V!!!!
Yes, nRF24L01 need clean 3.3v.
Hi,
I am interested in one of your Wireless DS18B20 Room Temperature Sensor (Battery Powered). I have a system and I´m not using the MySensors Library, is the signal transmitted open and can I read this with my nRF24L01?
Hi Graham,
i m using nRF radio connection as per mysensors if your library/sketch can use same pin then i dont see any issue.